Pineapple Fruit Bowl 🍍

fullsizeoutput_118a

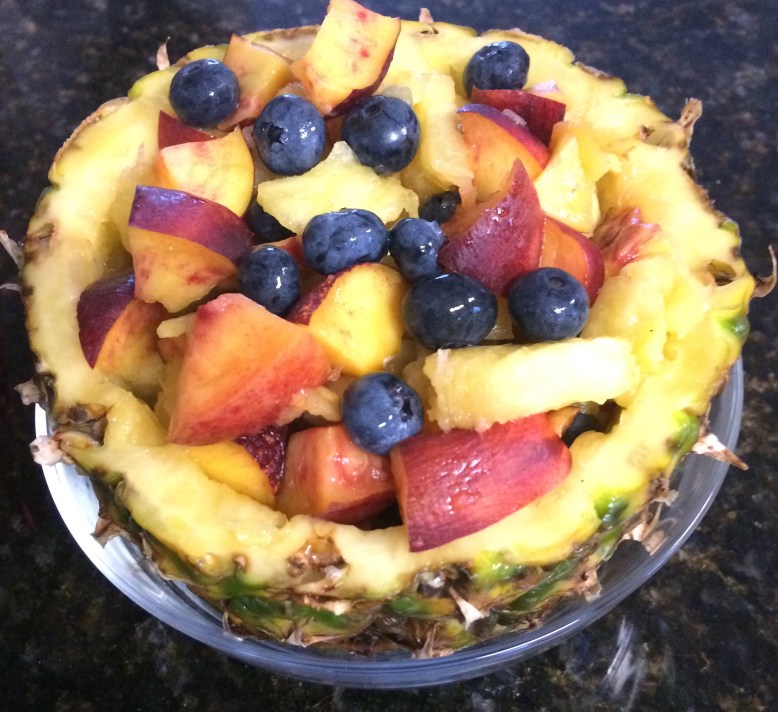
A healthy dish that I enjoy for breakfast or as a dessert is a pineapple fruit bowl. This is a simple dish if you’re looking for a healthier alternative, which is super fresh and great for breakfast, dessert, or a snack. I love that I can use any fruit I want inside the pineapple. The fruit that I used in this one included blueberries, nectarines, and sliced pineapple for the inside, then used the outer bottom half of the pineapple as my bowl. It is a great idea that I highly recommend. I have listed the recipe down below. I look forward to reading all your comments.

Things you will need:

Pineapple

Blueberries

Nectarine

Cutting board

Pineapple corer slicer

Carving knife

Instructions for Pineapple fruit bowl

  1. On the cutting board, slice off the top of the pineapple.
  2. Take your pineapple corer slicer and spiral slice the inside of the pineapple until all the fruit is out from the inside.
  3. Slice the pineapple into bite size wedges.
  4. Next, cut the pineapple shell about 2/3 of the way down to create your bowl.
  5. Wash and slice additional fruit into bite size pieces. I sliced up nectarines and added blueberries in this one.
  6. Then, mix up the pineapple slices and the other fruit you wish to add and place them inside your pineapple bowl.
  7. Enjoy!!!

© 2018 Sundown Pointe


Advertisement

Red Forest Cake

IMG_9304

Black Forest Cake is a popular dessert over in Germany especially in the Black Forest., It is one of my favorite desserts. This dessert usually uses chocolate cake, but since I didn’t have the right cake mix, I decided to add my own spin on it by creating a Red Forest Cake using red velvet cake. This recipe is super easy to make, and is a great treat for dessert, a snack, or a special occasion. It is also a great recipe to get kids involved.I look forward to reading your comments!

Things you will need:

1 box red velvet cake (I used Betty Crocker)

1 ¼ cup of water

½ cup of vegetable oil

3 eggs

Toothpick

2 8 inch round cake pans

2 21 ounce cans of Cherry filling (I used Great Value)

Cool whip (16 oz)

Instructions for Cake:

  1. Heat oven to 350 degrees
  2. Spray pans with cooking spray
  3. Divide batter between the two pans
  4. Bake cake as directed on box until toothpick comes out clean
  5. Let cake cool

Instructions for decorating:

  1. Once cake is cool, cut the two cakes in half so you have 4 circle slices.

IMG_0995

2. Spread cool whip over first slice.

IMG_6715

3. Take some cherries and lay on top of cool whip.

IMG_2768

4. Take second layer of cake and lay it on top and repeat steps 2 & 3 until all four layers are complete.

5. Put some cool whip in a bag and decorate cake as shown in the picture above.

6. Enjoy!!!!!!

fullsizeoutput_1142

Note: If cool whip starts becoming too soft, place in fridge or freezer for 15-20 minutes.

© 2018 Sundown Pointe


Chocolate Raspberry Brownies

img_20180306_133745034-1.jpg

Chocolate and raspberry are one of my favorite combinations, especially when it comes to baking. The raspberry gives the chocolate a great rich complementary flavor. I was very pleased with how this recipe turned out, and I am excited to say I found a new way to make brownies! This recipe is super easy and great for family get-togethers, or any other occasion. I look forward to reading your comments!

Makes approximately 9-16 bars

Things you will need:

1 box of brownie mix (I used Duncan Hines)

8 oz. of cream cheese

½ cup of confectioners sugar

½ cup of raspberry filling

8×8 pan

Instructions for brownies:

  1. Bake brownies as directed on box until toothpick comes out clean
  2. Pull out of oven and let it cool
  3. Spray Wilton’s Spray-N-Seal on and stick in fridge for 5 minutes

Instructions for Raspberry Icing:

  1. Using your kitchen aid, beat the cream cheese, confectioners sugar, and raspberry filling until smooth.
  2. Spread over brownies
  3. Enjoy!!!

© 2018 Sundown Pointe